CHAPTER 6
In my snippets box, I have pulled out one of the partial
routines or code blocks which I had to invent as the bike project developed.
It is called myh2dec.asm.
In the first lines of the program I write it's purpose and the date. I see
I also commented on routines on offer in the internet, which simply didn't
work.
The routine itself is very straight forward and it's purpose clear. The main
program does all it's calculations in Hexadecimal, but when we need to show
the results on a Liquid Crystal Display, an LCD then we must change the hex
into decimal.
For example, suppose the speed module calculates the present speed is 0xD.
Ah , 0x is the way we say that the following number is hexadecimal, so 0xD
is 13.
If we don't change to decimal, the LCD will show maybe Speed D km/hr
Not very useful, How about Speed 1A km/hr, ( 26km/hr I hope)
Lets comment the program to change the hex to dec. I use it extensively.
It is slow but works fine.
I'll add new comments useful to us for study, in a
different font letter style
;-----------------------------------------------------------------
; myh2dec.asm version 1 Sept 01 written by Fred
;-----------------------------------------------------------------
;
; MY HEX TO DECIMAL FOR LCD
; The ones from the internet simply didn't work, this is slower ; ;but
incorporated into bike asm works fine.
; All of the lines above begin with ; and are just
comments, they are useful for the ;information they contain, especially the
date and version +My grumbles on ;wasted ;time
; the next three lines tell the compiler what microcontroller we are using.
, ;Include
; has standard definitions, and _CONFIG is shorthand for no code protection,
no
; watchdog timer, the oscillator type is an XT crystal and power up delay
active
LIST P=16F84A ; 16F84A Runs at 4.000 MHz
INCLUDE "p16f84A.inc"
__ CONFIG _CP_OFF &_WDT_OFF &_XT_OSC &_PWRTE_ON
; the error level comments are clear
enough
ERRORLEVEL -224 ; supress annoying message because of
tris
ERRORLEVEL -302 ; supress message because of page change
; The cblock is where the variables
are defined. Note the starting address is given 0x0C
cblock 0x0C
ones
tens
hex
count
ENDC
; There is no interrupt routine
( jump to ORG 4) so not here but it is in the main prog.
ORG
0 ; start at location 0
GOTO Main ; jump over to
main routine
; Here the program proper starts.
Note that the Labels ( ending “:”) are in the first line.
; Yet when you use it in a command, don't write the “:” e.g. GOTO
Main(no :)
; also if main and Main
are written differently( case sensitive) ;then, we get an
error
;message ( not found or not defined)
.
Main:
clrw
movwf count
movwf hex
movwf ones
movwf tens
movlw 0xF
movwf hex
; put all variables to zero just
in case they have been used else where and have
;a number inside them
; The conversion to decimal is very simple. A counter COUNT which initially
is
; set to 0, is compared to the HEX number
that is to be changed into decimal.
; if they are different, the counter increases by one. At the same time
the
;variable “ones” also is increased
by one, so they are the same. However
;when count increases from 9 to 10 (0xA), ONES is reset to 0 and TENS by+1.
; This means that for ever 10steps, units go to zero and decades increases
by 1
; Put another
way we have converted to decimal and can now send the HEX
; equivalent as two decimal digits to the LCD
;The process stops when the xor test sets the STATUS, Z flag. When HEX and
; COUNT are NOT the same, the btfsc command skips and the conversion ;
continues.
; When they finally are the same the xor gives 0 and so the btfsc test does
not
;skip letting the
GOTO Decout
instruction be executed and
we exit the
;conversion. This system can easily be
extended to hundreds, thousands….
H2d: ;change
hex into dec, start all zero
movf count,w
xorwf hex,w
btfsc STATUS,2
GOTO Decout ; they are equal
incf count,f ; count < hex
incf ones,f ; this may make one = 10 so test
movlw 0xA
xorwf ones,w
btfss STATUS,2
GOTO H2d ; ones is not 10
incf tens,f ; ones is ten, so add 1 to tens
clrf ones ; put ones to 0
GOTO H2d ;
Decout: ; now tens and ones
hold decimal o/p
nop
GOTO Decout
end
;------------------------------------------------------------
; End of Hex to Dec routine
;------------------------------------------------------------
Debugging ” myh2dec.asm” with MPASM
Well
now that we have added more comments to the file and think it is all right,
let's see what new windows in MPASM we can use to test it.
So as not to change things too much, we will use the same picproj directory
after removing the bits and pieces of firstest.asm.
Just let's compare beforehand what we are going to do with the steps we had
to follow before . This time there is no setting up needed. MPLAB will remember
unless told otherwise, that we are debugging a program.
Recalling the things we did, we set up:-
-
to work in Assembler
-
to use MPLAB simulator
-
for a PIC 16F84A,
-
that the xtal frequency is 4MHz
-
that the hex output is the default
-
that the source file .asm is in Dir picproj
-
and that all the other things we set up are unchanged
( we will see the use of some of the options which were selected. but not
explained.)
Next the sequence to start a new project. This a little like putting the
cart before the horse, but we will name the new project the same as the assembler
file, myh2dec.prj
(This is very necessary when we start debugging lots of different routine
modules. E.g. Test 22.asm is a bit meaningless and can be downright confusing,
when a couple of days have passed and we are back tracking trying to remember
the last module that worked before changing.)
The names themselves, can be different but you must always have the file
in the same directory as the project. Otherwise MPLAB refuses to go on.
So we open MPLAB and follow use the following menus
-
Click on Project
-
click on new project
-
name it as myh2dec.prj
-
Careful here… MPLAB sometimes goes back to it's root directory. So reselect
the picproj directory before saving.
-
The project window now needs a node Click Add node
-
We have no program yet. Lets jump out of the list and make it
Select the text we have above for the hex to dec routine. Copy everything.
We should have copied
;-----------------------------------------------------------------
; myh2dec.asm version 1 Sept 01 written by Fred
;-----------------------------------------------------------------
;
;
MY HEX TO DECIMAL FOR LCD
…………
……………..
…………
……….
end
;------------------------------------------------------------
; End of Hex to Dec routine
;------------------------------------------------------------
In MPLAB click on File in the top Bar
Select NEW
An empty file window opens
Use control V
To fill the empty window with the text we have copied
Save
Name as myh2dec.asm
We can go back to the PROJECT sequence, we were at point 6
-
In case the project menu has closed.
-
Click PROJECT
-
Click Edit project
-
Click Add node
-
Now we can select myh2dec.asm
-
Click OK
-
Done.
The new project has been opened, named and connected to a file with the
extension. Asm.
Now if we are lucky, when we click Build All in the project menu it will
compile with no errors. But if it doesn't look for items which have moved
from their position because of moving the copy from the word. Doc, or comment
“;” characters which have got lost.
Note When I did this text move I got the following warning messages.
Building MYH2DEC.HEX...
Compiling MYH2DEC.ASM:
Command line: "C:\ARCHIV~1\MPLAB\MPASMWIN.EXE /e+ /l+ /x- /c+ /p16F84A /q
C:\PICPROJ\MYH2DEC.ASM"
Warning[205] C:\PICPROJ\MYH2DEC.ASM 21 : Found directive in column 1.
(ERRORLEVEL)
Warning[205] C:\PICPROJ\MYH2DEC.ASM 22 : Found directive in column 1.
(ERRORLEVEL)
Build completed successfully.
(The error level instructions had drifted to the left during the move.
So once moved away from column 1, the compile was then warning free.)
So once we have compiled the project error/warning free, we will start to
debug and open some of the menus.
We press F5 and F6, we should see we have jumped to the start of the code.
So to start with, in fig23 we have the following view

fig 23
Good. Now we can experiment advancing the program line by line to see where
it goes during its execution. We SINGLE STEP pressing F7.
Try it. Return to the start, pressing F6
Now this is good, but we need to watch the values of the variables that we
are using.
In fig 24 we click on WINDOW, watch window, New
Watch window.
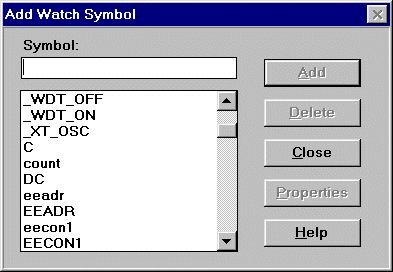
Fig 24 watch window
We need to follow the changes in the four main variables of the hex to dec
module. So we look in the list and select count, tens, ones, hex.
These then appear in the previously empty Watch Window. Their initial colour
is black, but every time the project passes through a line where they are
named, they will change to red if they change actual.
Fig.25 watchwindow +program window
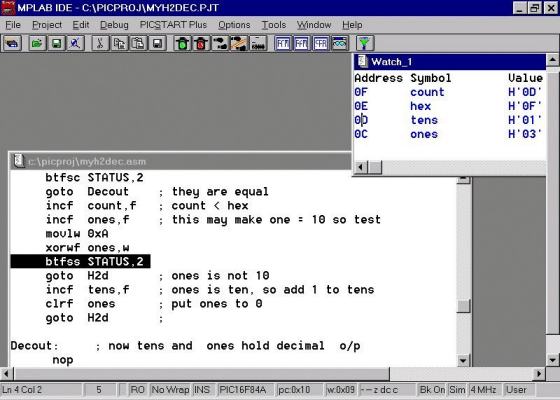
Let's position the Watch window
on the right and resize with the mouse.
Start stepping with F7. The values in the watch window will change colour
and increase as the program advances. It will finalize when COUNT is equal
to HEX. It will then stay trapped in a little loop the just repeats itself.
The snapshot on the right shows the variables when count has reached D and
tens +ones show 1 + 3
Read together = 13
The F5, F6, F7 and ( control + F9 ) keys
We will introduce two more keys. F5 and F9.
F5 stops execution when the program is running
F6 resets to the beginning of the program
F7 allows single stepping.
F9 starts the program, but it goes so fast we can't see much, just the time
that is passing.
So we need an execution speed that is somewhere in between F7 and F9
Control + F9 is what we need, slow execution.
We can still see the variable changing as the program advances
We will stop, reset and start again
Please note that reset means jump back to the start. It does not put the
variables to zero. Some code lines in your program will do this if you want
it to. Other times you will want to leave the variables alone and hold their
values till needed later.
So run the program a couple of times looking at the variables as they change.
Also when we jump back to start with F6, the variables hold the last
values.
Finally try to run using F9 by itself. It is so fast that we don't see the
variables changing. Use F5 to stop the program, then you can see if anything
has changed.. No'
But it has changed, all the variables have been cleared and the program starts
each time at the beginning when we press F6. The reason we don't see the
change with F9 is that it is going full speed and takes very little time
to reach the .
We will open another window now to do some time measurements.
The StopWatch Window
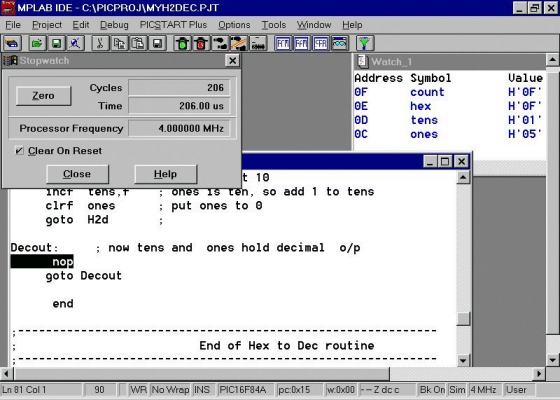
Fig26 stopwatch
This is very useful. It shows the time that an action takes, the action can
be moving one line or cycling through the whole program.
Lets try timing how long the conversion of hex D to 13 takes. We will use
the
Control +F9 combination as F9 alone is too fast. Right ,we see the
program is at the end and in the do nothing loop, so stop and read the time
taken, a little over 200usec.
If we watch, a few other things become clear. When we reset with F6, the
time also goes to zero. If we don't want this, untick the “ clear on
reset” button. It is also clear that the exact conversion time is difficult
to gauge just looking at the variables and hitting the F5 stop button. So
lets make the Decout label a break point
We get to the option from Debug, Break setting, Break point
settings
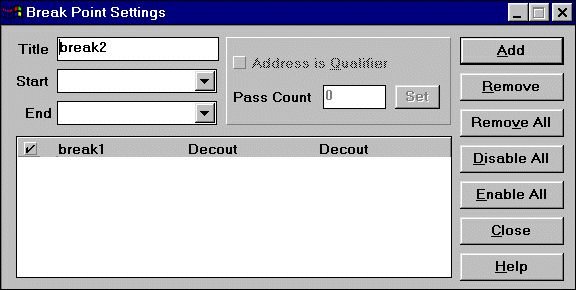
fig 27 debug points
Next click the start arrow and we are shown the avail points for setting
a break. We select Decout and click Add then close.
Now when we run the program see how it stops when it gets to Decout.
Look at the time on the stopwatch, it is shorter than we thought, 182us.
The logical question that arises here is… is this a short time or a
long time ? Well that depends on your application. In the bike application
we have about 1 second between refreshes. Also the main calculations are
done in a couple of milliseconds. That means we can spare some time to convert
to decimal. Also the speed and the time and the Average velocity are all
small numbers.
The distance is the exception, we measure up to 99999 …. ( good grief
at first sight it will take more than a second. E.g. 99999 x 100us is 9.9999
secs….)
So as a little exercise lets add on a couple of more variables and expand
the hex to dec routine to be able to measure up to 99999 . You do it . You
just need to copy the loop adding new variables at the start. Lets call them
hund, thou, tenthou… enough for 999999. Also we need more hex variables
to hold the start number . The max for our variables is FF= 255. two variables
in series would hold 65536 as FFFF.
But can you do this just like that?
Well yes and no, we need to program a bit more then?
Yes.
Ok to keep it easy we will stop at 255, making hex initially FF.
When we measure the time taken about 3 ms, a rough comparison gives that
count to 15 ( subtracting the initial set up) takes about 165usec. So a count
of 1 is around 13 to 14us. 255 x 13 = 3.3 ms. OK this scheme is linear. The
bigger the number to convert , the longer it takes. You say then
“Well if it takes 10 sec to count to 99999, the bike is doing nothing
when distance is a big number.”
Fair comment, now think of a solution … an easy solution.
While we are doing all these modifications, have you noticed that just touching
the asm file means we have to recompile all over again. That is, go to PROJECT
menu and Click Build all. Get the message all correct and then run the new
version.
This is inescapable. MPLAB has no way of knowing what has been changed. She
simply knows that the file is different. So she won't let you run the program
until the program has been recompiled in a project rebuild
Another detail.
If at some point we stop to reset the Stopwatch to measure some lines of
code. When we try and restart by pressing F7 or F9 or F9+control. It doesn't
start. The reason is when we have several visible windows, we need to have
the program window active, or selected to make it respond to our key presses.
Fair enough but not too obvious in the beginning.
(
This is for those of us who have never
heard of a stack)
In the windows menu there is another option called stack. If we click on
it we gat a new window simply called Stack window. It is blank initially
with a cryptic message
“1 Return address”
This window shows you how many sub routines are being used at a given moment.
A little more information is necessary. It only tracks subroutines that are
started with the CALL instruction, not with the GOTO instruction. You can
jump about all over the program with GOTO instructions and the stack doesn't
care .
CALL is different. You go somewhere. OK, same as the GOTO. Yes but the GOTO
doesn't return to where you jumped from, the CALL instruction does.
When the CALL is finished, you expect to be able to carry on with what you
are doing and so you have to store critical values before you go to the CALLED
routine. There you will do something and could change the old value of the
CALCULATION register, which we know by now is the W register. So we store
it and some FLAGs, If these are changed or aren't changed, we replace the
old values anyway when we come back.
But can you call with in a call? Yes up to a value of seven calls. This is
called nesting. The PIC has a stack depth of 7.
Not clear. OK, we'll try and invent an example with a car computer. . We
are cruising along at say 100km/hr. The computer get s an alarm that something
is wrong with the engine.
We store speed in stack level 1 and call motor
Motor may have a couple of possible values but as this is an alarm we store
checking water temp as Wtemp. In stack level 2
Motor checks the various processes and finds a flag in oil.
Checks oil and there is oil. Notes level =1 stack level 3
Oil module checks temperature and it is now normal, 180ºC Stack 4.
Sorry about the example it is not very good.
The only thing I want to say is we have to keep track simultaneously in the
working register of 100, 2, 1, 180.
You can't jump back with the value 180 as you were driving at 100. So you
invert the process going back through the stack and restoring the values
to each level.
Is seven levels enough? Depends how you program, but personally if I run
into the situation I try and change the sequence of operations or change
some CALLs into GOTOs. We have inserted these calls into the program and
this is what we see when all the calls are active.
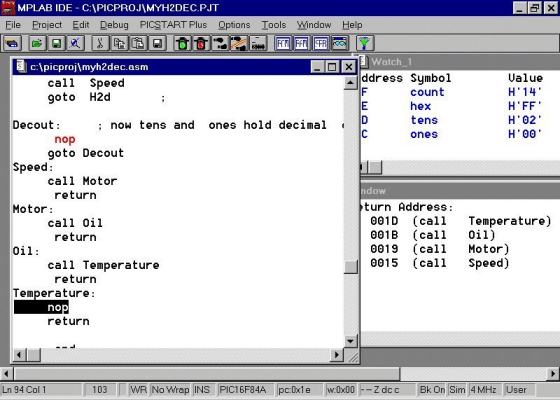
Fig.28 stack window
The program does nothing as each call routine has no operations except
the last call. Then it sees return followed by return, followed by return
until we are back where we jumped from ready to accept the next instruction
a GOTO. The GOTO also jumps but doesn't return.
Please note that the last called label, temperature is the top of the stack.
So we can imagine if we try and call more times than the stack has levels,
the first one called , Speed, will just vanish as it is pushed out of the
bottom of the stack..
Here we can stop and take stock
of the various new windows we are now using in MPASM. Of course there are
more, but we have sufficient to do normal code development with the following
windows SIMULTANEOUSLY in use ( i.e. opened for us to see what is happening).
-
The main MPASM Window to have access to the button icons, in particular,
for using the
-
Project, Build all, Buttons and the
-
Debug, Break settings, buttons.
-
The Stack Window for sorting out CALL problems. To be honest in this
application it is infrequently used, but in other CALL intensive applications
STACK tracing will be very important.
-
The StopWatch Window for timing the execution of everything in general;
from humble code snippets through major functional blocks to complete
programs.
-
The FILE WINDOW. which displays a file xxxxxxx. asm , our program.
This is perhaps the most important window as it allows us at all times to
see where the program is executing. We follow at three different speed settings
with
-
F7 Single Step, slowest speed
-
Control+F9, middle speed
-
F9 alone , fastest speed
-
The Watch Window. Also essential, because it complements directly
the FILE WINDOW, showing us at all times the value of the variables at each
step of the program execution.
-
The FILE MENU at the moment has only been used
to open the xxxxxxxx.asm file of our project. The other options are normal
text editor options.
-
The Project menu . This is a complex menu due
to the large variety of options it offers. To keep things simple as we are
beginners, we have used only the bare essentials for setting up to use for
debugging a PIC 16F84A. This means that we have accepted many default options,
but logically, later these may need to be tweaked.
-
The Window menu. We have listed in the previous
paragraph, that we use it for opening the essential windows to keep track
of all that is happening in the program that we are debugging.
-
The Debug menu. This is also a complex menu , as
beginners we are immediately interested in using Break settings and
Execute. Break settings to stop at some point and look at the values
of the variables. Associated with this is Execute an Opcode. Here we can
assign a value to a variable and see what happens immediately.
The rest of the menus offer options that are needed but not essential at
the moment.
As you get more hands on experience you will gradually open these menus to
find features you hope exist in MPLAB. We will only mention specifically
two of the menus.
HELP for example, offers TOO much and is complex, hard to use for
a beginner.
EDIT, is simple but you may prefer to use your own favorite
text editor.
EDIT takes us on to the next topic about getting started…


